syntax highlighter

Friday, January 27, 2012

Creating a Secret folder in windows

We all have valuable data which we like to protect and hide from the eyes of others working on the same PC. There are many ways of this like hiding it from folder options or creating user permissions or using some file safe software. My method is pretty straightforward and does not involve any of the following methods listed above. The main advantage of this trick is that when the folder is locked then there is no way to access this folder without unlocking it.Content in it does not show up in any kind of search while locked. I came across a script quite a long time back which does the above mentioned task by creating a folder named locker. Running the script when the folder is visible will lock the folder and make it non existent and running the script when the folder is hidden will unlock the folder if provided with the correct password. The script is as follows.


cls
@ECHO OFF
title Folder Locker
if EXIST "Control Panel.{21EC2020-3AEA-1069-A2DD-08002B30309D}" goto UNLOCK
if NOT EXIST Locker goto MDLOCKER
:CONFIRM
echo Are you sure u want to Lock the folder(Y/N)
set/p "cho=>"
if %cho%==Y goto LOCK
if %cho%==y goto LOCK
if %cho%==n goto END
if %cho%==N goto END
echo Invalid choice.
goto CONFIRM
:LOCK
ren Locker "Control Panel.{21EC2020-3AEA-1069-A2DD-08002B30309D}"
attrib +h +s "Control Panel.{21EC2020-3AEA-1069-A2DD-08002B30309D}"
echo Folder locked
goto End
:UNLOCK
echo Enter password to Unlock folder
set/p "pass=>"
if NOT %pass%== "Your password" goto FAIL
attrib -h -s "Control Panel.{21EC2020-3AEA-1069-A2DD-08002B30309D}"
ren "Control Panel.{21EC2020-3AEA-1069-A2DD-08002B30309D}" Locker
echo Folder Unlocked successfully
goto End
:FAIL
echo Invalid password
goto end
:MDLOCKER
md Locker
echo Locker created successfully
goto End
:End

Copy this script and paste it in notepad. Change the phrase "Your password" with the desired password without the quotes. Save the file as "anyname".bat . I recommend you to change the name with something sophisticated like win3xshell.bat and put it somewhere in windows folder so that it is very difficult locate without the name. Your folder will be created in the same directory of the script created above. This script is the only way of accessing the folder. If you loose this script then repeat the above procedure of creating the script in the same directory as the previous one and you could gain access to the folder once again without any data loss. Enjoy.



Thursday, January 19, 2012

Solution to Hackthissite realistic mission 2

In this mission what we have to do is to stop the meeting of some racist group by getting into their website and posting some ill things about the meeting .

You get your first hint through the page source or alternatively by pressing ctrl+a (select all). You see a hidden link "update" at the bottom of the page which takes you to the login page. On this page you have to use SQL Injection to get into the database. When the user input is not properly filtered on a website, we can run queries on the server from the client input element by using a proper syntax. For more information visit Here . How did we deduce that we had to use SQL injection? Simple, when we enter a single quotation mark (') in the form abc' in email field we get an SQL error which means that ' is not filtered properly and the query on the server side is considering it as the terminating ' leaving an extra ' which gives up the syntax error.

Example

select xyz from def where qwe='$q';

when we enter abc' we get something of the form

select xyz from def where qwe='abc'';

which gives the error

Utilizing the above concept we device a condition which would always be true (1=1) and append that condition to the server side query. -- indicates start of an SQL comment.

Solution - In the email field enter ' or 1=1 ;-- and press submit.

Solution to Hackthissite realistic mission 1

We all know that hackthissite.org is a very good source in learning and implementing basic "ethical" hacking skills. In this post i will be giving you the solution to the realistic mission 1.

Here what we have to do is to make a specific band go up to the top in ratings by getting into the website. When we see the ratings of all the bands we notice that it is basically some kind of averaging technique used from voting numbers 1-5 , but the first band has a rating of 23 something which hints a possible flaw in the method of averaging as normally the average should be between 1-5 .

Basically what we have to do is increase the rating of the desired band to go to the top. This can be done be simply changing the value of any vote in the last band section by using javascript injection or firebug(an addon for firefox) and then selecting that rating and pressing vote button. Insert a big value so that the simple average goes above 23 and you are done.

Removing unwanted ads injected by Internet Service Provider

Update:-  So I finally got some time to come up with another working solution. I have added it Here 

Recently i noticed that my chrome browser was showing a horizontal banner of flash based ad at the bottom of every page. First i thought it as some malware issue with chrome but i noticed same with a brand new installation of firefox or other browsers. My first thought was that something was wrong with my system (virus and all) but antivirus scans yielded nothing. After some googling i found out that my ISP was injecting ads into every page I visit. Every page that i visited consisted of the following injected code

<div id="sTREAMrIDE" class="9;14"></div>
<script type="text/javascript" src="http://ui.streamride.net/ui.js"></script>

In this code basically a javascript file is being loaded from http://ui.streamride.net and the acquired ad is being displayed in the div tag above.

Now to remove this there are 2 ways to proceed

1. STOP the website from communicating to the url http://ui.streamride.net so that it could not fetch the ad

This can be done by editing the host file which could be found in C:\windows\system32\drivers\etc\hosts (this is the default location. This may vary according to the drive of installation of operating system)

Open notepad as Administrator (right click on the icon and click run as administrator). Open the file from above mentioned location and add the following line at the end

127.0.0.1 streamride.net ui.streamride.net

Save the file and you are done.

2. Install an extension which disables scripts

You can also install extensions which removes or blocks the functioning of scripts on every webpage

Chrome :- ScriptNO

Firefox :- NO script


I am developing an extension to block the streamride script and will be posting the link of the extension soon. Till then enjoy..

Update:-  So i finally got some time to come up with another working solution. I have added it Here 

Saturday, January 7, 2012

Changing Permissions of /var/www folder in ubuntu

After setting up LAMP in Ubuntu we are ready to develop our own webpage but there is just one more step before we continue. By default a user is not allowed to access the var/www folder under the root and has to have super user privileges for the same. So we have to change the permissions of this folder and all of its sub folders to create,read,write and execute files.We do this by the following method

Step 1 :- Create a new group (www-pub) and yourself to that group

sudo groupadd www-pub
sudo usermod -a -G www-pub usera

Here "usera" is your user name. You must use -a to append to existing groups

Now display groups for a user (optional)

sudo groups usera

Step 2 :- Change the ownership of everything under /var/www to root:www-pub

sudo chown -R root:www-pub /var/www

Step 3 :- Change the permissions of all the folders to 2775

sudo chmod 2775 /var/www

2=set group id, 7=rwx for owner (root), 7=rwx for group (www-pub), 5=rx for world (including apache www-data user)
Set group ID (SETGID) bit (2) causes the group (www-pub) to be copied to all new files/folders created in that folder. Other options are SETUID (4) to copy the user id, and STICKY (1) which I think lets only the owner delete files.

Step 4:- There's a -R recursive option, but that won't discriminate between files and folders, so you have to use find, like

sudo find /var/www -type d -exec chmod 2775 {} \;

Step 5 :- Change all the files to 0664

sudo find /var/www -type f -exec chmod 0664 {} \;

And now we are done. Now we can easily create and edit files in the www folder and all of its sub folders.

Creating a functional Login Page in PHP (LAMP Ubuntu)

In the last last post i showed how to install LAMP on Ubuntu and also to install phpmyadmin to have a graphical user interface for your databases. In this post I would be showing you how to use the LAMP environment to create a Login page for a website. The final page would look something like this


I would be focusing more on fundamentals and less on design as you can sit and keep experimenting with the look of the page yourself.

Before beginning you may note that we will be working in /var/www/ folder and as only root has access to these folders we would have to change the permissions of this folder. You can do this by following my previous post.

To Store the username and passwords and to extract them for checking with the provided username and password we will have to make a database and a table in this database to store the username and passwords in it.

Step 1 :- Go to terminal and write

mysql -u root -p

After pressing enter you will be asked to enter your password. Enter the password and then press enter. The whole process would be something like this


Step 2 :- Create a new Database by running the following command in mysql prompt (myqsl>)

create database webpage;

You can see if the database is created by using the command

show databases;

Step 3 :- Create a table login with three columns id,username,password.

create table login (id number,username varchar(20),password varchar(20),PRIMARY KEY(id));

Step 4 :- Enter a value in the database in order to check the user entered value. We will be storing the username as plain text but will be using AES(Advanced Encryption Standard) encryption algorithm to store the user password. We can use SHA1 or MD5 hashing algorithms but AES is the most secure algorithm of all.

insert into login values(1,"Ali",aes_encrypt("password","secret_key"));

We have used the function aes_encrypt to encrypt the password with a key "secret_key". Remeber the key as it is used at the time of decryption of the password.

We are done with our table management and now its time to create the actual web page.

I assume that the reader is well acquainted with HTML and PHP.Documentation of any of the PHP function or syntax could be found out on PHP Manual. The code of webpage would be of the form as shown below .

<HTML>
 <head>
  <title> Login Page </title>
 </head>
 <body>
  Sign In</br></br>  
  <form name="login" id="login" method="post" action="login.php">
   <table>
   <tr><td>Username</td><td>:-</td><td><input type="text" name="uname" ></td></tr>
   <tr><td>Password</td><td>:-</td><td><input type="password" name="pwd"></td></tr>
   <tr><td><input type="submit" name="sbutton" value="LOGIN"></td></tr>
   </table>
  </form>
 </body>
</HTML>
<?php
error_reporting(E_ALL);

if($_POST["uname"] != NULL)
$username=$_POST["uname"];

if($_POST["pwd"] != NULL)
$password=$_POST["pwd"];

if($_POST["sbutton"] !=NULL)
{
 //establish connection with MySQL

 $con = mysql_connect("localhost","root","password") or die('Could not connect: ' . mysql_error());
 
 //Select The required Database

 mysql_select_db("webpage",$con) or die('Could not select database: ' . mysql_error());
 
 //Extract the decrypted passwords and usernames from login table 

 $result=mysql_query("select AES_DECRYPT(password,'aliabbasmanager') as password , username from login",$con)or die('Could not decrypt: ' . mysql_error());
 
 //Find Out number of Rows of the desired table ie. the login table  
 
 $num_rows=mysql_num_rows($result);
  
 //Loop through the rows of table to check the password

 while($num_rows > 0)
 {
  $flag=0;  
  //fetch a row 
  $row=mysql_fetch_array($result);
  //extract fields
  $cuser=$row["username"];
  $cpass=$row["password"];
  //compare usernames & passwords
  if(strcmp($cuser,$username) == 0)
   if(strcmp($cpass,$password) == 0)
   {
    $flag=1;
    break;
   }
    
  $num_rows--;

 }
 if($flag == 1)
  echo "<font color='green'>successful</font>";
 else
  echo "<font color='red'>unsuccessful</font>";
 mysql_close($con);
}
?>


If you have any doubts in the code feel free to comment.

Friday, January 6, 2012

Installing LAMP in Ubuntu

In this post I will be showing you how to install LAMP on UBUNTU. LAMP stands for Linux Apache MySQL and PHP. LAMP is an open source web development platform which uses Linux as the operating system , Apache as the web server application , MySQL as the relational database management system and PHP as the object oriented web scripting language.

Its a very straight forward process

Step 1 :- Open Terminal

Step 2 :- Write the following code

sudo apt-get install lamp-server^

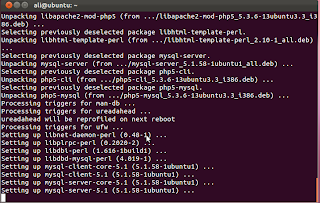
After executing the command given above the installation of LAMP will start on your machine. In between You would be asked to confirm by pressing Y . Don't hesitate in doing so. At some point your terminal screen would look something like this


Step 3 :- The terminal will ask u to change the password of MySQL database management software. Change the password and remember it as you would be needing it every time you connect to the database from your php script.

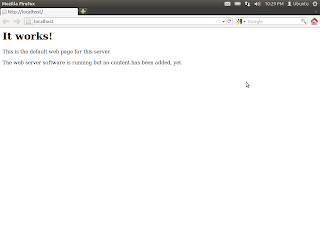
Step 4 :- After installation Open your browser and add the following link in the address bar

http://localhost

You will see something like this


This step was to ensure that LAMP has been installed successfully. The file displayed is index.html and is stored in /var/www/. All the new webpages and scripts have to be placed in this folder.

Step 5 :- These were the basic tools necessary to install a website development environment but in order to better manage our database throught graphical interface we may install phpMyAdmin. This step in optional and the user may skip this step.

Write the following command in terminal

sudo apt-get install libapache2-mod-auth-mysql phpmyadmin


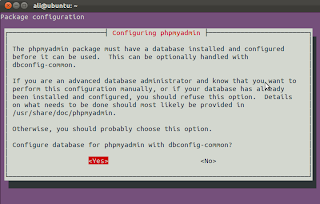
This will install phpMyAdmin and will open configuration windows as shown


Have the option apache selected and then press enter.There will be some activity in the terminal and then you will see something of the sort


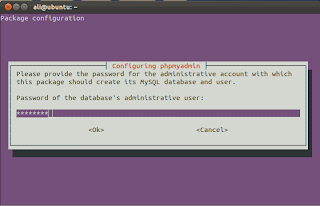
press enter and you will be prompted to enter the password of MySQL .


Enter the password which you entered while setting up LAMP, press to select the ok option and press enter.

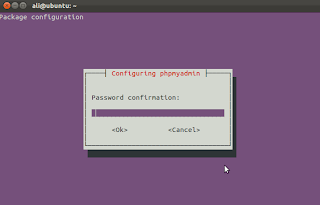
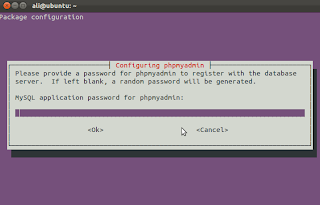
After that you will be asked to enter MySQL application password for phpmyadmin. I recommend using the same password as the previous one in order to avoid ambiguity.


Confirm the password in the following box


The phpmyadmin installation is now complete.

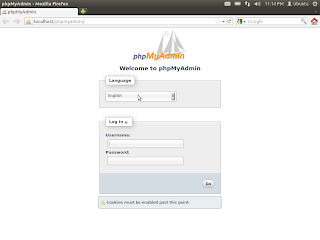
You can check the installation by opening the browser and entering the following address in the address bar

http://localhost/phpmyadmin/

You will see something like this


If you get an error of the form 404 "Not Found" then try the following codes

sudo ln -s /etc/phpmyadmin/apache.conf /etc/apache2/conf.d/phpmyadmin.conf
sudo /etc/init.d/apache2 reload


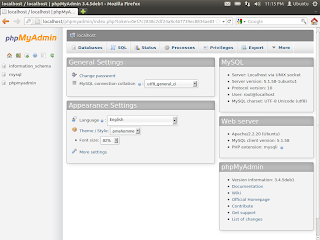
log in with username "root" and password which you assigned earlier.